Best Oven Ribs: Foolproof Method for Fall-Off-The-Bone Meat
Imagine tender, succulent ribs, glistening with your favorite sauce, the meat so impossibly soft it practically sighs off the bone with the gentlest tug. Achieving this culinary dream doesn't require a smoker, a grill master's touch, or even perfect weather. In fact, one of the most reliable and foolproof ways to cook truly exceptional ribs is right in your oven.
For many home cooks, the idea of preparing fall-off-the-bone ribs can feel daunting. But we're here to tell you that with the right approach – focusing on consistent temperature and patience – your oven becomes an ally, turning out remarkably juicy and flavorful results every single time. Forget the guesswork and embrace a method that promises perfection. Let's dive into making the best ribs in oven, a dish that will undoubtedly become a staple in your home.
Why the Oven is Your Ribs' Best Friend
While grilling and smoking have their undeniable charms, the oven offers a set of advantages that make it a truly "foolproof" method for cooking ribs:
- Consistent Temperature Control: Unlike outdoor cooking, an oven maintains a steady, even temperature throughout the cooking process. This eliminates hot spots and ensures the ribs cook uniformly, preventing dry patches and promoting even tenderness.
- Moisture Retention: When cooked properly in the oven, often covered for a significant portion of the cooking time, ribs benefit from a steamy, enclosed environment. This helps to break down tough connective tissues while keeping the meat incredibly moist.
- Set It and Forget It: Once your ribs are prepped and in the oven, you're largely hands-off. This allows you to focus on other aspects of your meal, or simply relax, without constantly monitoring temperatures or flare-ups.
- Weather Independent: Rain or shine, summer or winter, your oven is always ready to deliver delicious ribs, making it a reliable option year-round.
- Versatility: From delicate baby backs to hearty beef short ribs, the oven adapts beautifully to every type of rib, making it the go-to method for any preference.
Understanding Your Ribs: A Butcher's Guide for Oven Success
Before you even think about temperature and time, knowing your ribs is crucial. Different cuts come with unique characteristics that influence cooking. While our method works for all, understanding the nuances helps you achieve optimal results for any ribs in oven.
Pork Ribs: The Crowd Favorites
When most people think of ribs, they're likely picturing one of these pork varieties:
- Baby Back Ribs: These are cut from where the ribs meet the backbone. Shorter and more curved than spare ribs, they're known for their leanness and tenderness. Because they have less fat, they cook a bit faster and can be prone to drying out if overcooked, making the oven's consistent moisture retention particularly beneficial.
- Spare Ribs: Located further down the pig, spare ribs are longer, flatter, and boast more fat and connective tissue. This higher fat content renders them incredibly moist and flavorful when cooked low and slow.
- St. Louis-Cut Ribs: Essentially spare ribs that have been trimmed of the cartilaginous rib tips and often the sternum bone, resulting in a more uniform, rectangular rack that's easier to handle and carve. They offer the same rich flavor and moisture as full spare ribs.
Beef Ribs: Hearty and Flavorful
Less common but equally delicious, beef ribs offer a richer, meatier experience:
- Beef "Dino" Ribs: These are whole beef short ribs, impressively large and incredibly meaty. They come from the short plate section of the cow. Their sheer size demands a longer cooking time, but the reward is incredibly rich, beefy, and tender meat.
- Short Ribs (English-Cut): Often cut crosswise by the butcher into shorter, individual sections (around 3 inches), these can come from the short plate or chuck sections. They are marbled with fat and connective tissue, making them ideal for long, slow braising or oven roasting. Their smaller size means they cook quicker than their "dino" counterparts but still require ample time to become tender.
- Flanken-Style Ribs: Also from the short rib section, these are cut very thin (about ½ inch) across the bones, resulting in several bone segments in each piece. They cook much faster and are fantastic for marinating and grilling, but can also be roasted quickly in the oven for dishes like Korean Kalbi.
Pro Tip: When selecting your ribs, look for good marbling (streaks of fat) in pork spare and beef ribs, which translates to flavor and moisture. For baby backs, choose racks that are uniformly meaty.
The Foolproof Oven Ribs Method: Low & Slow for Perfection
The secret to fall-off-the-bone ribs in oven is a combination of proper preparation, the right temperature, and a generous amount of time. Patience truly is your most important ingredient.
Step 1: Preparation is Key
- Remove the Membrane: This is arguably the most critical step for tender ribs. On the bone-side of pork ribs, there's a thin, silverskin membrane. If left on, it becomes tough and prevents rubs and sauces from penetrating the meat. To remove it, use a knife to lift a corner of the membrane, then grab it with a paper towel (for grip) and pull it off. If it tears, just pick up another section and continue. Beef ribs generally don't have this prominent membrane.
- Season Generously: This is where flavor begins! Apply your favorite dry rub liberally to both sides of the ribs. Don't be shy – the more surface area covered, the more flavor infused. You can make your own rub with brown sugar, paprika, garlic powder, onion powder, chili powder, salt, and pepper, or use a high-quality store-bought blend. For even deeper flavor, season the ribs several hours, or even overnight, before cooking and store them in the refrigerator.
Step 2: Low & Slow Oven Cooking
The "low and slow" approach breaks down tough connective tissues, resulting in that coveted tender texture. Here's a general guide for temperature and time, but always remember that ovens vary, and ribs vary in size:
- Pork Baby Back Ribs: Bake at 275°F (135°C) for 2.5 to 3.5 hours.
- Pork Spare Ribs (or St. Louis-Cut): Bake at 275°F (135°C) for 3.5 to 4.5 hours.
- Beef Short Ribs (cut): Bake at 300°F (150°C) for 3 to 4 hours.
- Beef Dino Ribs (whole): Bake at 275°F (135°C) for 4 to 6 hours.
For more detailed timing and alternative temperature options, be sure to check out our guide on How Long to Bake Ribs: Achieve Tender, Juicy Oven Results.
Step 3: Covering for Moisture
To ensure your ribs stay moist and become incredibly tender, they should be covered for most of their cooking time. You have a few options:
- Foil Wrap: Place the seasoned ribs on a large piece of heavy-duty aluminum foil (or two pieces overlapped for extra security). Seal the foil tightly around the ribs to create a steaming pouch. Place the foil packet on a baking sheet.
- Baking Dish with Lid: If you have a roasting pan with a tight-fitting lid, you can place the ribs in it. For an extra layer of moisture and flavor, you can add a small amount of liquid (apple juice, beer, or broth) to the bottom of the pan before covering.
We recommend keeping the ribs covered for at least 75-80% of their total cooking time to allow the internal moisture to work its magic.
Step 4: The Finish Line
Once the ribs are fork-tender (more on doneness below), it's time to finish them off:
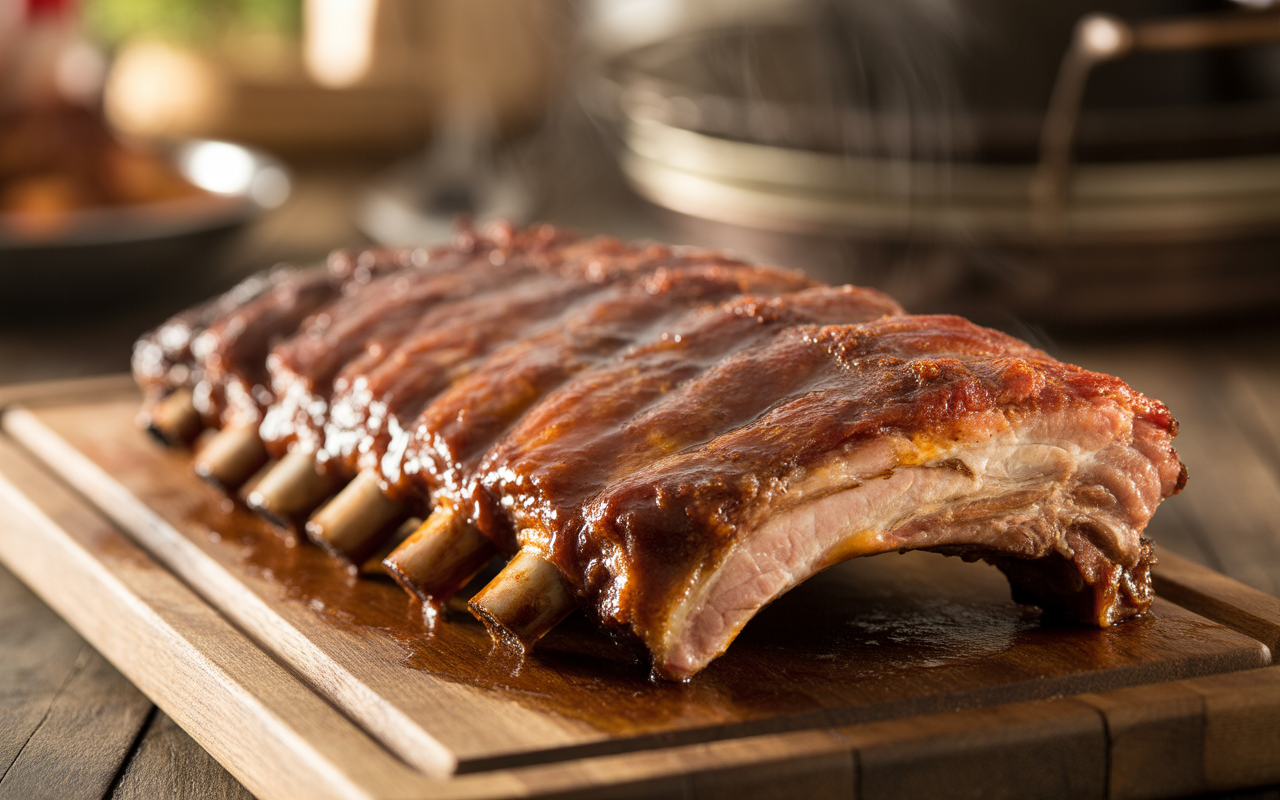
- Uncover and Sauce: Carefully remove the foil or lid. Drain any excess liquid if you wish (though some prefer to baste with it). Brush the ribs generously with your favorite barbecue sauce.
- Bake Uncovered (and Broil if Desired): Return the sauced ribs to the oven, uncovered, for another 15-30 minutes at a slightly higher temperature (e.g., 350-375°F / 175-190°C). This allows the sauce to caramelize and thicken, forming a delicious sticky glaze. For an extra char and "bark," you can briefly broil the ribs for 3-5 minutes, watching them *very* closely to prevent burning.
- Rest: Just like any cooked meat, ribs benefit from a resting period. Once out of the oven, loosely tent them with foil and let them rest for 10-15 minutes before slicing. This allows the juices to redistribute, ensuring every bite is moist and flavorful.
Achieving Doneness: How to Know Your Ribs Are Perfect
While timing provides a good guideline, the ultimate test for perfect ribs in oven is their tenderness. Here’s how to check:
- The Bend Test: Pick up a rack of ribs with tongs in the middle. If they are done, the rack should bend easily and the meat should start to tear away from the bone in the center.
- Wiggle a Bone: Grab a bone and gently twist it. If the meat is truly fall-off-the-bone, the bone should twist easily and feel loose, possibly even pulling free with minimal effort.
- Visual Cue: The meat should have pulled back from the ends of the bones by about ¼ to ½ inch.
- Fork Tender: When poked with a fork, the meat should offer almost no resistance.
Avoid overcooking, as this can lead to dry, mushy ribs. Aim for that perfect sweet spot where the meat is tender but still has a pleasant chew.
Tips for Heavenly Oven Ribs Every Time
- Don't Skip the Membrane Removal: We can't stress this enough. It makes a world of difference in texture.
- Patience, Patience, Patience: Resist the urge to crank up the heat to speed things up. Low and slow is the mantra for tender, juicy ribs.
- Use a Drip Pan: Place a baking sheet underneath your foil-wrapped ribs (if not already using a pan) to catch any potential drips and make cleanup easier.
- Experiment with Rubs and Sauces: The oven method is incredibly forgiving, allowing you to try a vast array of flavor profiles, from sweet and smoky to spicy and tangy.
- Embrace the Rest: Giving your ribs a short rest before carving ensures maximum juiciness.
Conclusion
Cooking fall-off-the-bone ribs in oven is a culinary accomplishment well within reach for any home cook. By understanding the different cuts, embracing the low-and-slow cooking method, and paying attention to a few simple preparation steps, you can consistently produce ribs that are incredibly tender, deeply flavorful, and utterly satisfying. So, preheat your oven, select your favorite rack, and prepare to impress your family and friends with a truly foolproof rib experience. Happy cooking!
